With the goal to have you transition to the latest Mastercam version, we have prepared instructions that will guide you through the most important steps to succeed in your transition.
DOWNLOAD THE SOFTWARE
You can easily download the installation files for Mastercam 2024 by following this link.
FIND YOUR CURRENT TYPE OF INSTALL
Is your current Mastercam installed using a Shared Mastercam folder located on the company network to be shared among other programmers or simply to be regularly backed up or is it stored locally on your workstation? To find out, you can simply open the Mastercam configuration page (ALT+F8 when in Mastercam) and look at the following section:
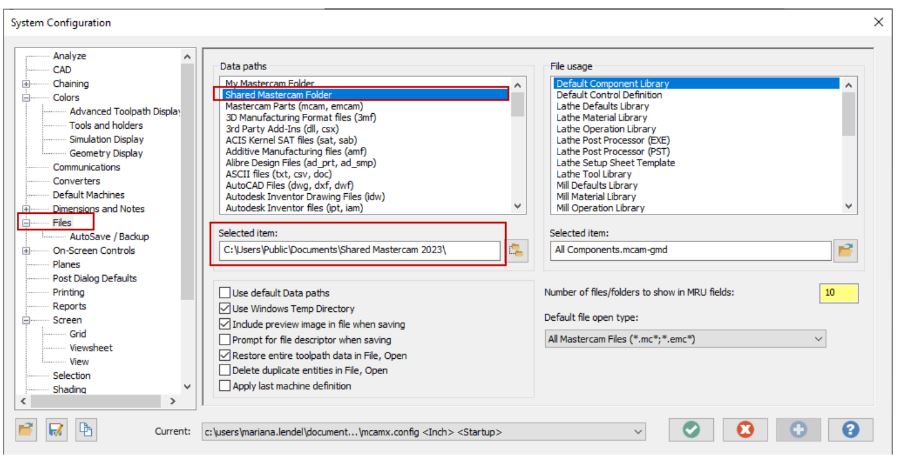
The default location can be found locally in the following folder: C:\Users\Public\Documents\Shared Mastercam 2023
If the path shown in the configuration is different than the default, take note of the location (Full UNC and not the shortcut of the mapped drive), it will come in handy in the installation process of the new version.
INSTALLING THE NEW VERSION
Before starting the install make sure you have all the administrator rights to proceed to the full software installation, this includes the local rights to install the software locally on the PC but also the read and write permission to the location where you plan to set the Shared Mastercam 2024 folder location, especially if you plan on putting it on the server.
STEP 1: Download Mastercam 2024 from mymastercam.com

STEP 2: Double click on the downloaded file of Mastercam 2024 to launch the installation process.
STEP 3: Choose the package you want to install, then select Mastercam 2024
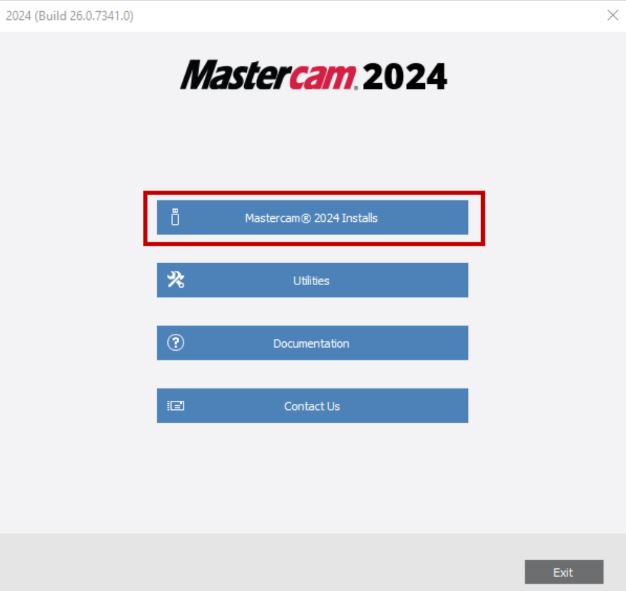
STEP 4: Select Mastercam installation language and click on Next
STEP 5: Click on the Configure Mastercam button (as highlighted in the image)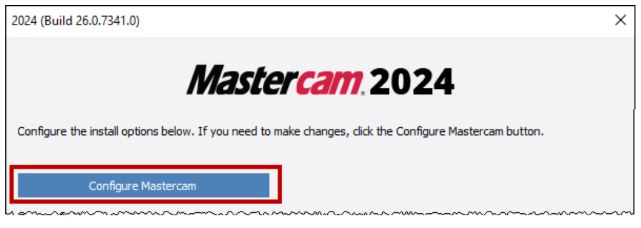
Review the following items:
The default unit system to be used
Username and Company Name
The path to the location of the \Shared Mastercam 2024. Here it is possible to change the path in the cases where you would like to put this folder on the network or on a different drive.
Keep in Mind: The \Shared Mastercam 2024 folder must be accessible at any time whenever you want to use Mastercam, so if you are using a portable computer, make sure you have a proper connection to the Company Network if you choose to change the default location, especially if working outside of premises. Otherwise, Mastercam won’t be able to start.
STEP 6: Finally, click on Done to close the Configuration page and click on the Next button.
STEP 7: Accept the License agreement and click on Next to start the installation.
MIGRATION PROCEDURE FOR MASTERCAM
Here is, in few simple steps, our preferred way to proceed to the migration of your important files between 2 Mastercam versions. (Posts, Tool libraries, operation libraries, machine files, etc…) The example will be shown for a migration from Mastercam 2023 to Mastercam 2024 but can be used for any other transition to a more recent version.
STEP 1: Create 2 new folders on your computer desktop. The first one will be identified M2023, and the second will be M2024
STEP 2: Open the \Shared Mastercam 2023 (or the version you are migrating from) and within the following sub folders, make a copy of the files you use and paste them into the M2023 folder you previously created on your desktop.
In the folder \Shared Mastercam 2023\CNC Machines\
Look for files with the following extensions: mcam-control, .mcam-mmd (mill), .mcam-lmd (lathe), .mcam-rmd (router) ou .mcam-wmd (Wire)
In the folder \Shared Mastercam 2023\(Lathe, Mill, Router, Wire)\Posts\
Look for files with the following extensions: .PST et .PSB (if present) that you use
In the folder \Shared Mastercam 2023\(Lathe, Mill, Router)\Tools\
Look for files with the following extensions: .Tooldb that you use
In the folder \Shared Mastercam 2023\(Lathe, Mill, Router, Wire)\OPS\
Look for files with the following extensions: .mcam-operations et .mcam-defaults that you use
If you are using a custom setup sheet, don’t forget to look in the folder \Shared Mastercam 2023\common\reports\SST for the files with .RPX extension
that corresponds to the setup sheet you use
If you are using the Mill-Turn module, make sure you look into the following folder \Shared Mastercam 2023\Mill Turn\Machines for files with the following extension: .machine that you use
STEP 3: Once all the important files have been copied into the M2023 folder on the desktop, you can launch the M2024 (or the version you want to migrate to).
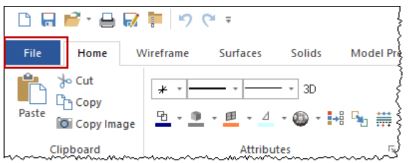
STEP 4: In Mastercam 2024 Go to the File
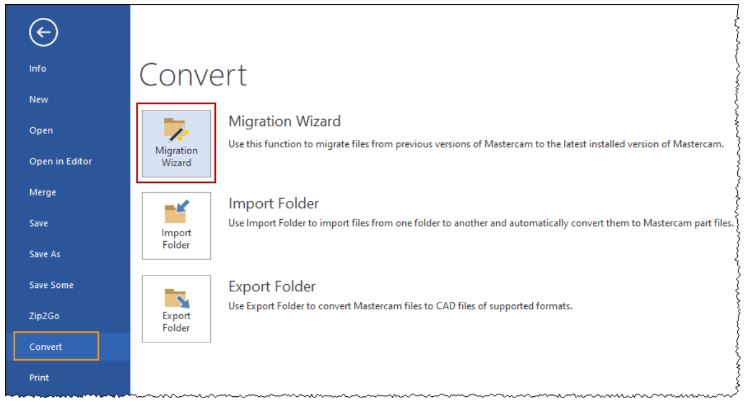
STEP 5: Select Convert>Migration Wizard
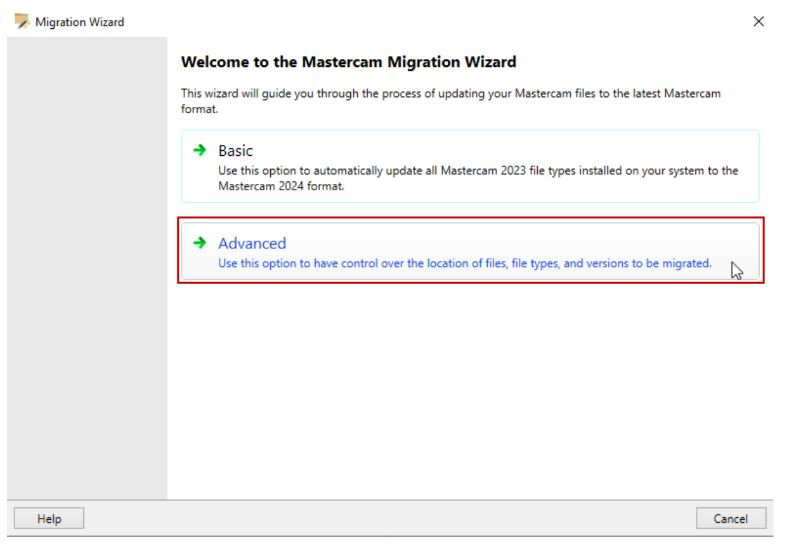
STEP 6: Select the Advanced button
STEP 7: Use the Browse buttons and select the Source folder (M2023) and the Destination folder (M2024) from the desktop.
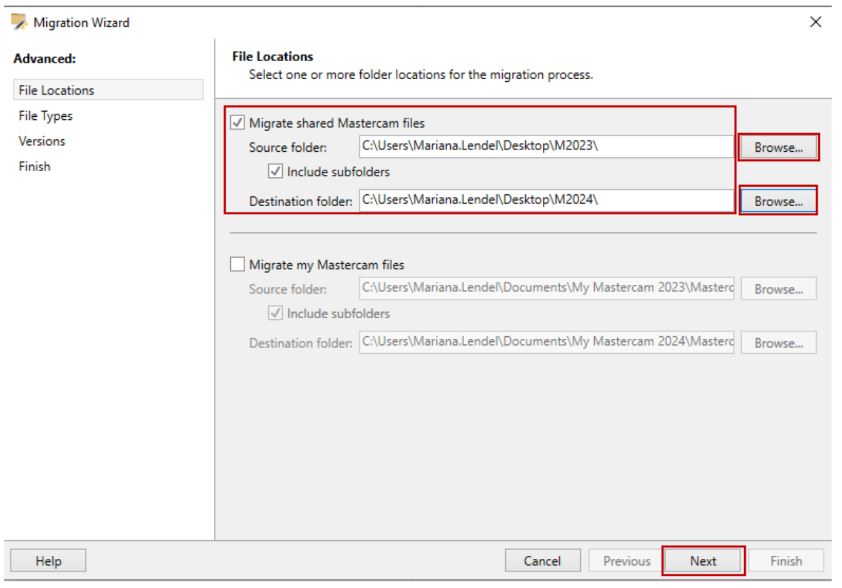
LAST STEP: Click on the Next on the 2 following pages and Finish at the end.
Once the process process completed you should have in the M2024 folder an updated copy of all the files. The only thing left to do is to place the new files in the same subfolder that you found them but in the \Shared Mastercam 2024 folder.
And that’s it!
If you are having trouble and need support, Email: [email protected]

